Giant Clock
I built a big clock, some may call it giant, but I don’t know. It’s pretty big though: 65x22 cm. It is based on the design from Ivan Miranda, although I had to modify it to fit my “small” 3D printer. So it’s only 75% of the original size.

But it is it not enough to just print it at the 75% size, the 3D printed parts need to interact with other things that can’t change their size, like the LEDs. By scaling down the model, the designed space for the LEDs is not enough anymore and it doesn’t fit. So I had to modify the models slightly to make some room for the LED strip.
Yes, for the LEDs, I’m using an addressable LED strip. I cut it in segments of 5 LEDs each and rewired them in single strip again. It’s very important that each number has the same wiring of the segments, as you can see later in the code.
For the code, I went for my own approach, as I wanted to have integration with home assistant. You can see it in the attached file, it uses the esphome platform for an easy build.
Code for ESPHome: giant-clock.yaml
It is quite straightforward: in the substitutions: section configure the parameters for your setup (GPIO pin, number of LEDs, etc…). Change also, in the esphome: section the name and board if it’s different. You may need to tweak the light: component if you are using something different.
It will take the time from a SNTP server and, if you are using home assistant, it will use that link to HA to guess the local time zone, otherwise it would use UTC. Alternatively, you can modify the time: section in order to configure you time zone.
Special mention is needed for the segment-order substitution variable. It defines the order in which you have wired the segments of the numbers. All numbers need the same wiring as there are assumptions in the code (basically, it’s using the same segment_order array for all of them).
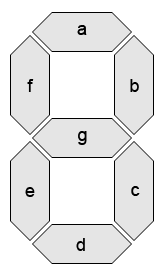
In my clock, I wired them in this order: C -> D -> E -> F -> A -> B -> G. So, the segment-order array is: “{4, 5, 0, 1, 2, 3, 6}”. It says that A is the 4 position, B is the 5 position, C is in the 0 position, and so on. It is a zero-based index array.
How should I improve it? Maybe by using a different color per digit? segment? Let’s see…
Back in a bit!